Friday, December 15, 2017

It Has Been Fun...


I have enjoyed writing this blog, taking photos of my artwork and discussing various workshops I have taught and taken. 

I managed one blog each week in 2016, then blogged twice a month during 2017. 

So now, after 76 blogs in two years, it is time for me to take a break. I still plan to have fun making art, do more traveling, continue to practice calligraphy, and to make handmade books. 

Hope you are enjoying all your fun art pursuits as well. Send me a comment some time and let me know you are out there having fun.

Thanks so much for reading my blog!
©Anne Rita Taylor 2017

Friday, December 1, 2017

Painting a Sunset


I wanted to have a serene painting for our bedroom. 

I found a photo that I liked, copyright-free. Plus I used acrylic paints - they dry quickly and mix with water.


I started by painting Gesso (Liquitex) on  a 24 x 36 inch wrapped canvas. Gesso is a primer base, helping acrylic paint to adhere to the canvas surface.  First I brush side to side with a 2 inch brush, wait a little bit, then up and down for even coverage.

Golden acrylic paints before & after painting - cleans up with water.
Several years ago Hobby Lobby had a clearance sale on Golden Acrylic paints. I was lucky to find this pricey paint on sale. They last forever too. If they dry up a little, adding water to the jar works fine.


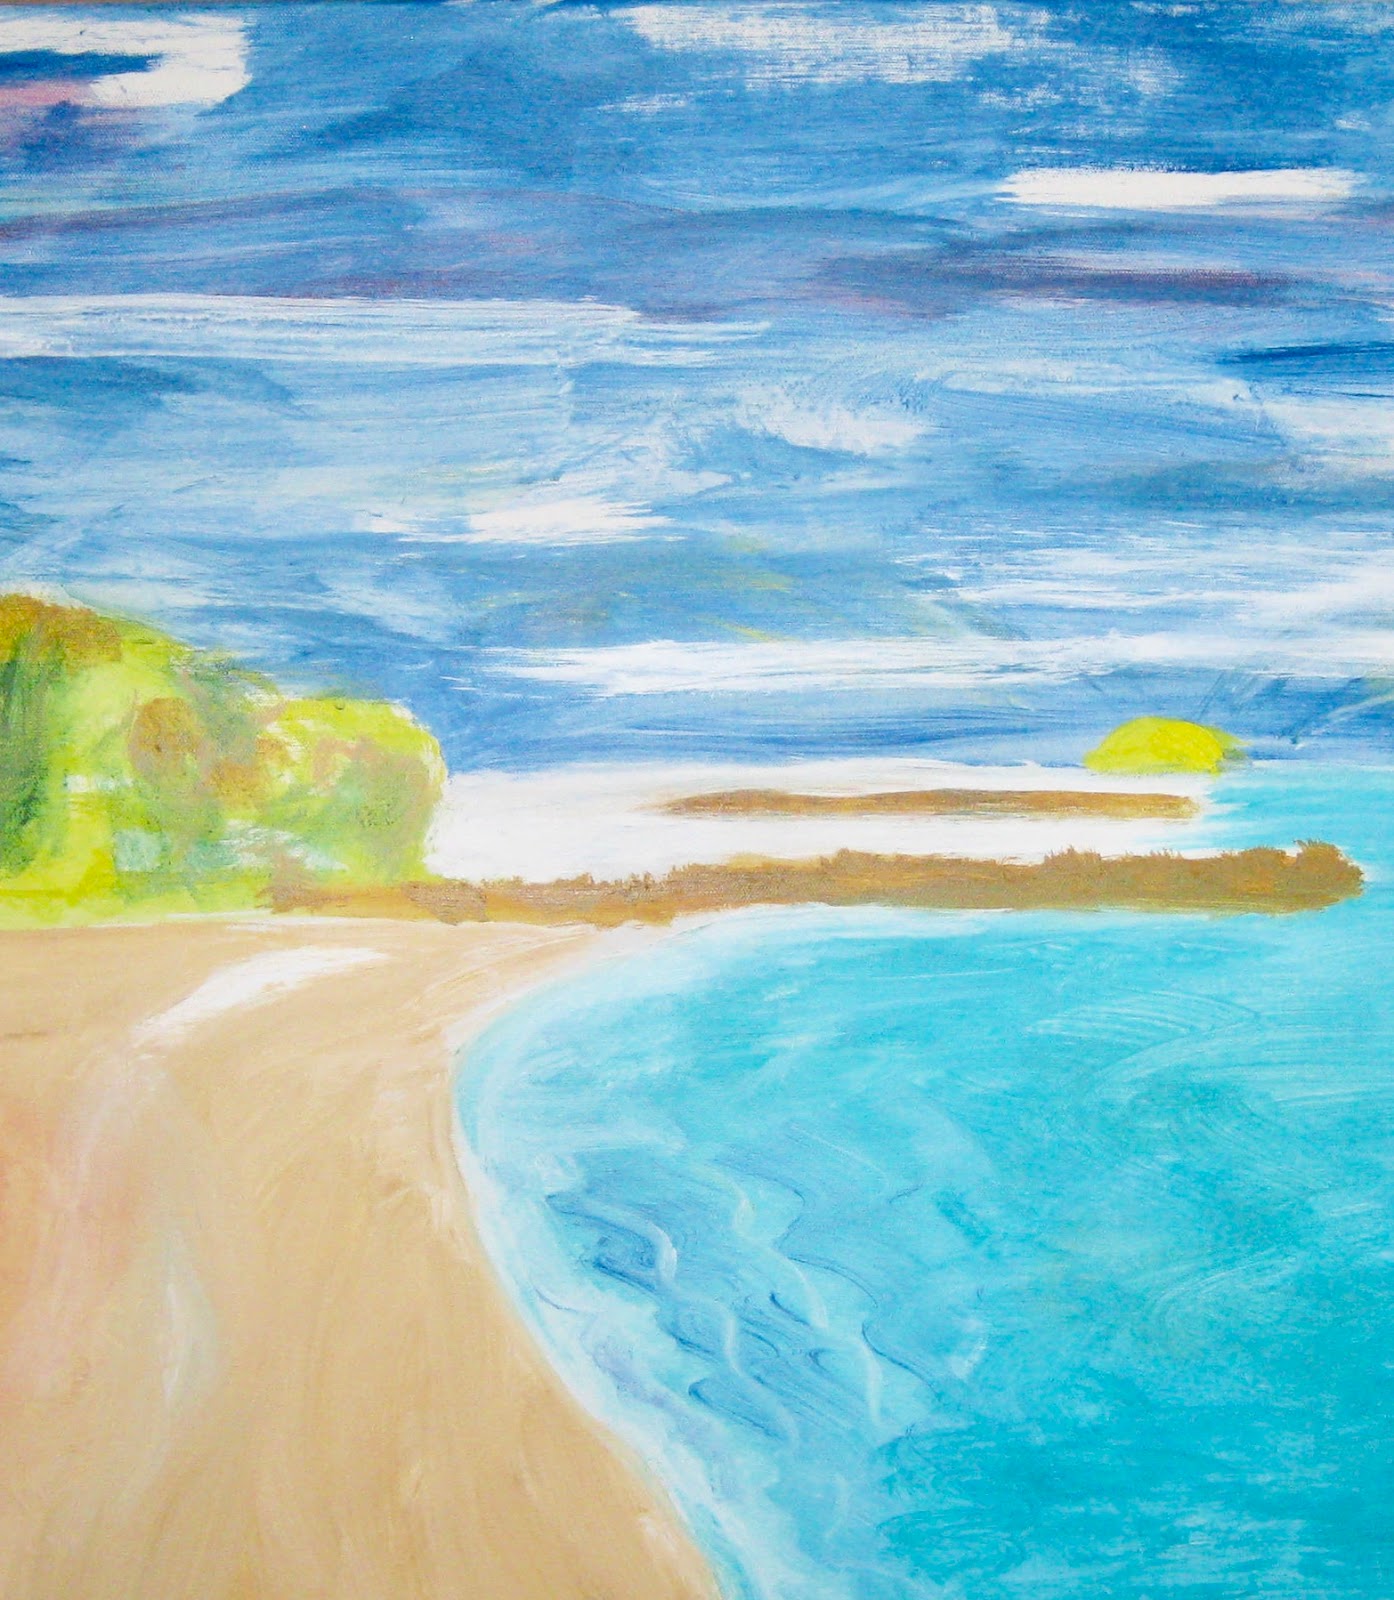
I started painting the green bushes. First light green which is Golden’s Green Gold, then darker strokes of Jenkins Green to show depth. For the jetty I used Yellow Ochre mixed with Titanium White. I also used these for the sand with more white mixed in.

https://youtu.be/35JcqznA_iU - Click this link for the short video - under one minute!

I applied the turquoise water next using Cobalt Teal, spreading it on the canvas with a palette knife. Then brushing in some Cerulean Blue, Chromium with a 2 inch brush.

At first I did not have a sun setting, the photo did not have one. Before I added the sun, I thought it looked plain to me. I added the sun, some rays, red streaks with Quinacridone Crimson which I did not like either. And the right side of the sky looked too dark.

So I brushed on Titanium White, making a streak across the sky. I liked it better. As with all my art I am not 100% satisfied, but that is why I make art, to see how I can improve next time.

The final part is signing my name and applying the wire hanging. Using a screw eye on either side about 2/3rds of the way up, I attach the wire cord and it is ready to hang. Here it is in my bedroom along with my Degas Ballerina.

©Anne Rita Taylor

Friday, November 17, 2017

Art Journal Collaboration


I was part of an art journal collaboration in 2006. There were fourteen of us, artists and clients of the leader who had a Process Painting business. A condition to join was to take her class which I did. Kind of like art therapy, but it was not for me.

Tiger on the back cover - flower on the front cover
I wanted to be part of the art journal collaboration even though I did not know all the parameters yet. We each had our own book that was passed to the next person every 3 weeks. 


We each picked a theme, mine was Floral Journeys to remind me of where I came from: I grew up in a family-owned flower shop. I had a sign-in page, here I blanked out the signatures. On my first page I had an accordion book, here it is opened.


Perhaps I had too much art instruction in my past to fully engage in Process Painting. Getting psychoanalyzed as I painted was not for me in 2006. 


In February 2007 we had an art exhibit at The Winter Street Studios in Houston. I sent the postcards to everyone I knew at the time. Many people showed up - it was a fun evening.


Each collaborator had to contribute money towards the art opening: food, security, rent, etc. Cost me $250 in 2007. That was the minimum fee to pay the leader, or my work would not be shown. The leader’s daughter bought one of my handmade books. And I sold another handmade book during the exhibit.

Here is the flip page video of my collaboration book:


Inspiration for the collaboration came from fifteen artists participating with art journaling documented in “True Colors” published in 2003. It is a fabulous, awe-inspiring book. If you like art journaling at all I recommend you buy it immediately.


Please tell me about your experience participating in art journal collaborations.
©Anne Rita Taylor 2017

Friday, November 3, 2017

To Outline or Not To Outline - Watercolor


Since many artists use calligraphy with sketches and watercolor, I took a weekend workshop recently at the Watercolor Art Society-Houston (WAS-H): Pen, Ink and Watercolor, for all levels, given by Joan Hughes.


On the first day, after getting our tube paints, plus flat and round brushes arranged, we got to work right away, no student introductions, no preliminaries. 


We started by tracing Joan's sketches on large light boxes. 
The first sketch was an apple, carrot and onion. After tracing with pencil, we used our Micron pens to cross hatch, make squiggly lines, not to show too much and no outlining! Then we could watercolor very lightly.


The second sketch was a fluffy cat, no outlining here! Still needs work. 


The third sketch was more advanced, a chair with end table, lamp, plus frames on the wall, mon Dieu! I worked and worked on mine, then Joan came over and made suggestions. I’m OK with how it came out.


Joan was not in favor of outlining. I could tell because she kept saying, “No outlining!” to all the students. 

In the Houston Calligraphy Guild Retreat in May, see my blog about that, here, the artist Shirl Riccetti told us to outline each sketch we made. 

So I was fully flummoxed!


Next Joan demonstrated how to use a flick of color to paint bodies for people. I loved these! I thought I was rather good at it too - I went wild making those little background people.


We sketched other people too and I was told by Joan, “Oh, you outlined!” Joan painted the hair on the middle person.

Other than the sketch samples, a handout of a grid of textures reminded us what to use instead of an outline.  I made use of that when we sketched and watercolored Queen Elizabeth on the second day of the workshop.


Next we traced Joan’s sketch of a poppy flower. By this time, Joan was telling us to watercolor before we used our Micron pens, so we would not outline too much. My flower remains unfinished. Maybe I’ll play with it again one day or leave it this way.


We finally sketched and painted a couple of windows and doors on the afternoon of the second day. 

In the ad for the class was a sketch and watercolor of a building so I thought that was what we would be doing, for the most part.

An hour before the class ended we traced the sketch of The Alamo, Joan demonstrated watercoloring the sky. Mine remains unfinished. 

Since WAS-H is across the street from The Menil Museum, I walked over there after class and enjoyed myself while looking at the Surrealist paintings.

All in all , it gave me a glimpse of how another artist works. But I still like outlining. Please let me know if you have any thoughts on the matter: To outline or not to outline.
©Anne Rita Taylor 2017

Friday, October 20, 2017

Easy Pencil Calligraphy

All pencil work except "City" as noted below, is artwork by Anne Rita Taylor, enhanced by filters.

Last Saturday I led a presentation at the Houston Calligraphy Guild with a few techniques from Amity Parks workshop at the Legacies II Calligraphy Conference in 2014, called Graphite Techniques. Graphite, otherwise known as pencil lead, is a mixture of carbon and clay, not lead.

The #2 pencil is considered 2B or an HB combination. A hard graphite results in a light grey - H for Hardness. Soft lead is darker, B for Blackness. 


My handout has the four techniques I demonstrated. We started with drawing shades with any pencil, from light to dark. This is called the VALUE of a color, so you learn how to vary your pressure while using a pencil.


Next was an exercise for a Cross Contour, that makes words pop and look three dimensional as you can see on my handout with the words JOY and PLAY.


Two tables were set up for hands-on play: one with graphite sticks. You can cover a large area with graphite, then use an eraser to write into it. A famous artwork using powdered graphite is “City” by Ed Ruscha, made in 1967, held in The Broad, a contemporary art museum in Los Angeles. 


The other table had water-soluble graphite sticks. Also cover a large area, then write with a paintbrush wet with water. Or use the graphite as watercolor where I wrote: Believe, with the quote above.


A big difference is graphite can be erased, but the water-soluble graphite cannot be erased as easily. Water-soluble graphite mixed with water is an ink wash, like painting with watercolor except it looks like pencil markings. Fun to spray water on a quote made with water soluble pencil, comes out like this:


All in all, I think 40 calligraphers enjoyed a few techniques I learned in Amity Parks workshop. And I can’t wait to take her next workshop in March when she comes to Houston to teach Mixed Media. What do you think about pencil calligraphy?


Varied my writing pressure using a #2 pencil, plus brushed on water soluble graphite.
©Anne Rita Taylor 2017

Friday, October 6, 2017

San Francisco Book Arts


The Book Arts Jam, organized by the Bay Area Book Artists in San Francisco is so much fun. Every year, it is a one-day celebration of the book, print & paper arts, now held at the Elks Lodge in Palo Alto each October - this year on the 15th. Click here for more information.

Polymer clay covers, imprinted with my carved dragonfly
Paste paper accordion: Italic calligraphy

During the Exhibition of Artist Books I bought these fun books, Book Artist Blues, an open edition, and The Tourist, mine is #20 out of a limited edition of 30, from Nikki Thompson of Deconstructed Artichoke Press. 


Green Chair Press was there, I loved this handmade spiral bound book, A Reader’s Diary. Comes with a pretty bookmark to remind the reader on rating the book. Lovely idea and I had to have it!


At the Exhibitor Hall I bought this lovely print that hangs in my kitchen.
I saw this wonderful handmade bone folder from Don Drake, owner of Dreaming Mind Bindery and had to have it. Once a year Don sells his handmade bone folders at local book art events and I was lucky to see it early in the day. By the end of the day he sold out.


My husband Kevin enjoyed talking with Ingrid Butler of Moth Marblers. Kevin knows how to marble paper and fabric. Kevin bought this lovely silk necktie. For more info on Ingrid, go here.

They had 50 vendors and I spent all day visiting and learning with mini-workshops, from 11 am to 5 pm. It was a heavenly day!


And no visit to San Francisco is complete without a visit to the City Lights Book Store where I actually met Lawrence Ferlinghetti - an unforgettable experience. Do you recommend any book arts events?


©Anne Rita Taylor 2017

Friday, September 15, 2017

Halloween Books


Even though Halloween is a month away, it’s fun to show books I made recently. I also have suggestions on how to use them.


My friend, Liz Constable of Book Art Studios in New Zealand, used skull paper for her book covers. She inspired me to make books with two prints of skull paper I had in my paper stash.


This book is an ode to Liz, who taught me a form of Coptic binding last year when I won her Facebook contest. See my blog about winning - here. Liz will give online classes soon and she is a fabulous teacher, very patient!


The other book I bound with a French Link Stitch to fit into a box. Art Supply on Main in Houston (where I taught last July 2016) sells box kits, the box below I made with their kit.


Important to keep in mind the needle catches under the thread closest to the next hole (or station) to make the French Link. Also be sure to use a Kettle stitch at the top and bottom so your book covers will not wobble.


I came up with these uses for a Halloween book:

1. Visitor book for Trick or Treaters using their costumed character name, such as Wonder Woman, Batman, etc.

2. Halloween party guest book using visitor names and scary comments about horror movies they love!

3. Personalize: write their names on book covers for family and friends.


When would you use a Halloween Book!?! 

Boo!


©Anne Rita Taylor 2017