Friday, September 30, 2016

Journaling a Book of Hours

Personal journals are for lists, quotes, maps, art, appointments, perhaps prayers, and every day musings. In the 13th to 15th century a Book of Hours was a personally owned prayer book. 
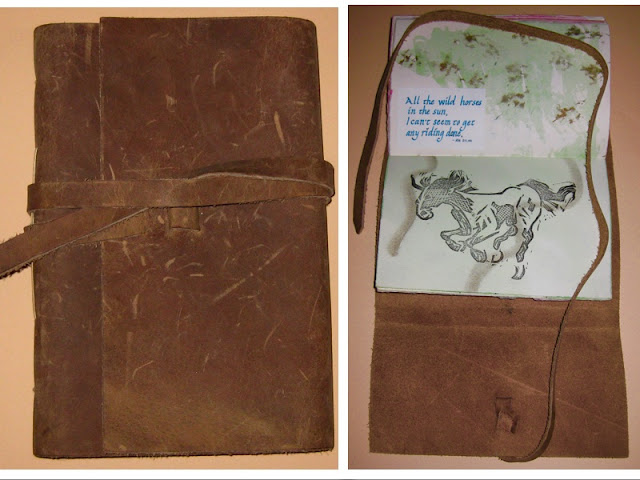
The Contemporary Book of Hours workshop, through the Houston Calligraphy Guild, was taught by Carol Pallesen; she teaches at the Nevada Museum of Art in Reno. Carol's Foundational Calligraphy class starts October 18th.
From The Illuminated Page, Ten Centuries of Manuscript Painting in the British Library by Janet Backhouse, 1998
Medieval Books of Hours were written in Latin and lavishly decorated. 
Current journals have many variations; I use mine for calligraphy practice and art journaling.
The leather covers are 8 x 16 inches. In the workshop we tore 3 sheets of Arches paper. Carol's handouts included resources, definitions, history, sewing cradle instructions & calligraphic page proportions. I highly recommend taking Carol’s worthwhile class.
We decorated paper using Pelikan Plaka paints (the colors come from Germany; black and white are available from Dick Blick). Easy to write over this paint with FW Acrylic ink.
I got carried away - what else is new!?! I decorated pages with a red leather cover from Carol. Recently I bought leather from Tandy Leather to make books using variations of the long stitch binding.
Shameless plug: Today I sell smaller versions on my Etsy site: www.ARTbooks.Etsy.com in different sizes, prices, & with doodads, mostly white pages. Custom orders on request!
Please let me know if you like this book style with wrap around covers. Reminds me of Indiana Jones and the Last Crusade!
©Anne Rita Taylor 2016

Friday, September 23, 2016

Making Books with Beads

I’m having fun this week making books with beads. Using my beads from CJ Bead Store in Katy.  


I made this beaded fringe book in a Houston workshop a few years ago.


It was very pretty with feather charms and various sizes of beads. As I remember - it took all day. So far I have not made another one exactly like it!


This week I made similar books using only a few beads with the Coptic binding. 
I used stiff board covers with 5 holes. And on the 5 signatures I used 7 holes with two for the kettle stitch at each end. The amount of thread is 10 times the length of the spine. 
An important part of Coptic binding is to cross the thread over the last inserted thread and go back with your needle into the same hole.
There are many kinds of Coptic binding tutorials.  There is an excellent online resource: click here.
I need to use some of these keys I collected. How do you use your collections; I would love to hear from you!
©Anne Rita Taylor 2016

Friday, September 16, 2016

Knotting a Pearl Necklace

I met with the Crafters Anonymous group on Saturday, a local crafting group.

We bring whatever craft we are working on. I brought beads and supplies to make necklaces. Plus I repaired a few of my necklaces, one has a Guillamine bead I bought in Africa.


On January 29th I wrote about creating with beads - click here to read that blog. 

I recently bought faux pearls at CJ Bead Store in Katy. Last summer I took a pearl knotting class there from Joy. I made two necklaces in small and larger size faux pearls. The supplies include: fish hook clasp, two knotting crimps, bead cord and pearls.
Plus the tools include scissors, needle-nose pliers, and this long needle awl.
First you thread the knotting crimp, make a knot, hook the crimp onto the fish hook, as pictured.
The difficult part of pearl knotting is getting the knots in between and up close against each pearl.
Place the tip of your thumb up against the knot to make sure it rests close to the pearl. My finished pearl necklace I made this week is sized in between my two others. 
Plus I made these necklaces to give as gifts. I plan to give them as Christmas gifts in 3 months. Tell my nieces not to look!
I’m glad I bought several large Guillamine beads, also known as African Trade Beads, when I visited Africa. Bead prices range from 50 cents for smaller beads up to $25.00!
Please let me know if you have tried knotting a pearl necklace or if you have any questions about how to go about doing it.
©Anne Rita Taylor 2016

Friday, September 9, 2016

Lettering Text & Texture

Creating experimental calligraphy pages during a three day workshop with Yukimi Annand - from the Los Angeles area - was so much fun! Please try some of these suggestions.

Start by using Sumi ink with increasingly larger pieces of balsa wood to make marks and write the alphabet. My 12 x 18 inch paper from Hobby Lobby, has 60 sheets: multi-media art paper for less than $10.


Yukimi handed out about 20 instruction pages, with quotes taken from a book I own and love: Wabi Sabi

Quote by Claude Monet: The richness I achieve comes from nature, the source of my inspiration.


Try making one letter in many different ways. And then try a whole alphabet using the stick letters.


Use brushes with rags attached playing with Yukimi’s favorite colors: FW Acrylic - Payne’s Gray and Burnt Umber.

Create abstract pieces, work with Dr. Martin’s Bleed Proof WhiteThe third day we put our book together: one-sided pages with glue stick covered with folded black Arches paper. Each person took center stage to show how we worked.

Fun to play! Class photos below taken by Yukimi Annand.


At home I played with one of my pieces to add some color with Prismacolor pencils.
I would love to hear from you - any questions or how you enjoy experimenting with your lettering, making marks, text and texture.
©Anne Rita Taylor 2016

Friday, September 2, 2016

Creating a Clamshell Box

I finally made another Clamshell Box! I learned how to make a Clamshell Box in an Austin workshop in 2012. I made another box from the pre-cut boards as soon as I arrived home.

A Clamshell Box is a custom made case for historically important books in museums or libraries, offering protection against light, wear and tear.

This week I made my box from start to finish: cutting the boards, gluing; making sure my book fit the box. I gathered my supplies:
right edge ruler, plus smaller ruler to get in tight spaces
scissors
bone folder
pencil
brushes
PVA glue
Davey board - thicker than mat board
Not pictured: 
X-Acto razor, 11 blade to cut board - I use my CARL Cutter to cut smaller pieces
paper or book cloth to cover your box

First, I measured my Link Binding Book: 6 5/8 x 10 1/4 plus the depth is 1 inch. I needed 11 pieces of board: the lower tray does not fit the book perfectly since 1/8 inch of the board thickness, two on the length and one for width, are added. The top tray goes over the lower tray plus 3 sides - remember the 1/8 for all the sides, then 3 boards - looks like a cover for a book. 

The sides are glued on top of the tray. Then roll the glued sides of each tray on the paper. Remember that your finished box will depend totally on the size your book. Mine was 10 3/4 by 6 3/4 for the lower tray. And 11 x 7 x 1 1/8 for the upper tray.

I used the paper Debbie gave me for my July workshop, 1 1/2 sheets of  20 x 30 inches. My order of gluing after rolling the sides: bottom back, front tray sides, top sides, then top back.

Remember to cut the sides in v shapes so your paper is not clumped up. It really is fold over, measure and cut as you go. Your amount of paper will depend on the size of your book.

I made the books for the Austin Clamshell Boxes to fit inside. I recommend making a box for your book instead. My recent box took hours to make but was a fun challenge too. 
Let me know if you have questions and be sure to tell me about your experience with making boxes for your books.

©Anne Rita Taylor 2016