Friday, May 27, 2016

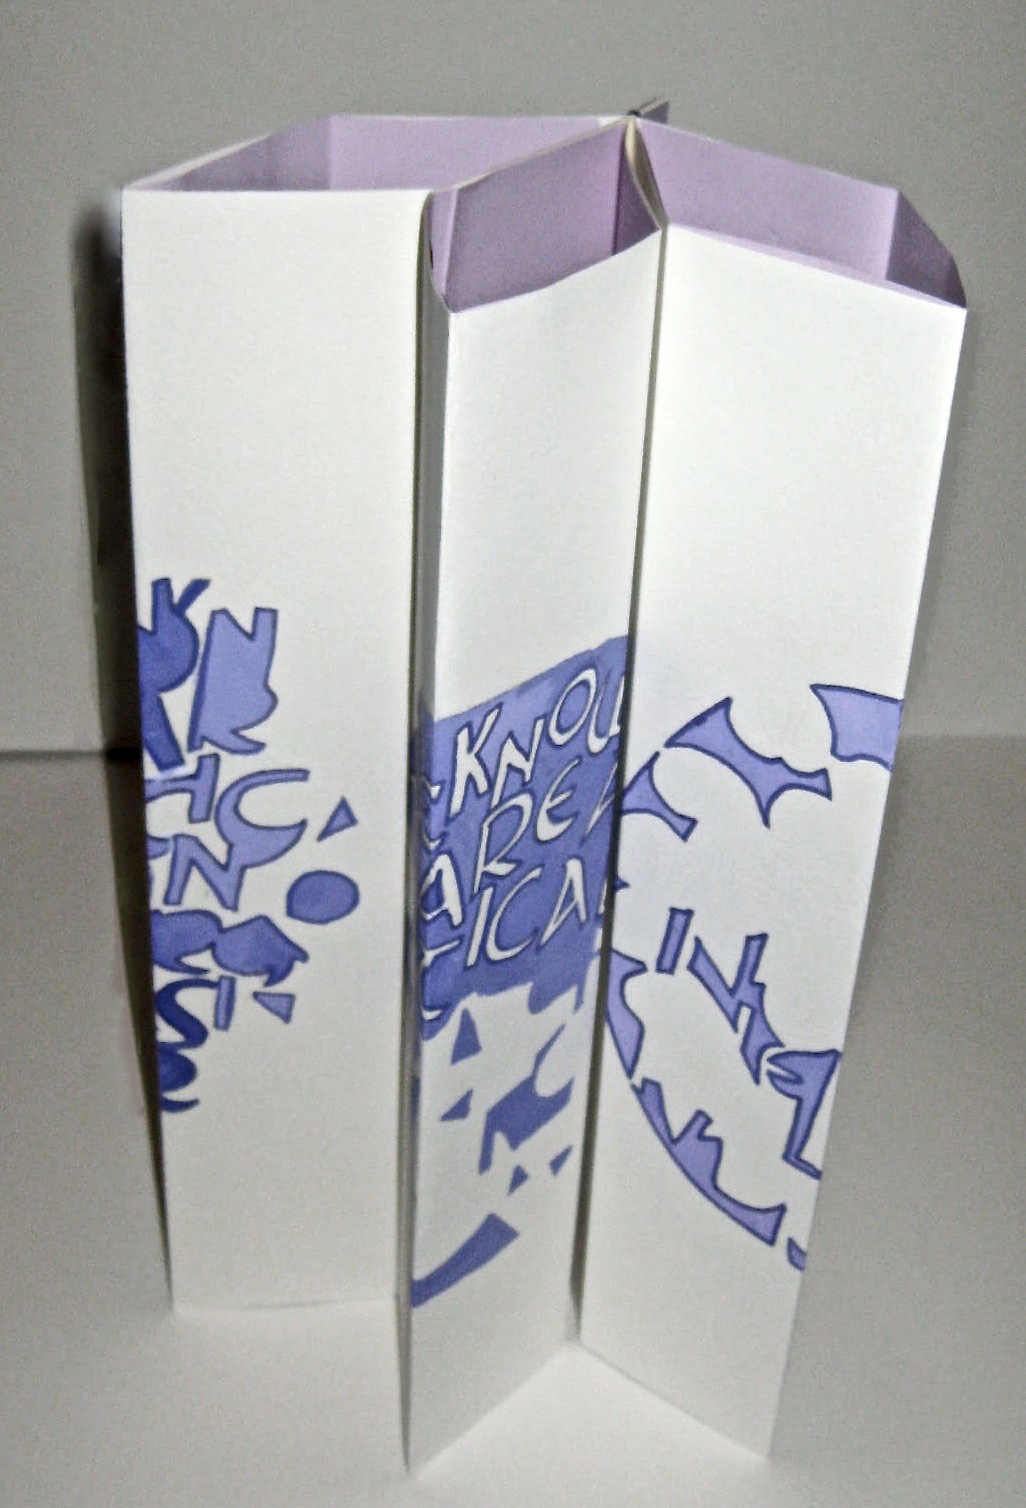
Folded Card Holder

©Anne Rita Taylor 2016

A few years ago I made folded card holders to hold techniques to decorate paper. I printed the pen and the fleur de lys, my hand carved images.


Finished size is 5 inches square. Original size of paper: 12 by 15 inches, with 4 inch square cards inserted inside.


When I wanted to give a few cards (Business Cards or Artist Trading Cards) to someone I wanted them in a nice folder. I made the Folded Card Holder with handmade paper and it added that special touch.


Supplies:
Handmade paper, 8 1/2 wide x 11 inches long
Artist Trading Cards or Business Cards


Fold the wide side 1 and 1/2 inches on each side.


Turn over, and fold at 2 and 3/4, and 6 and 7/8 inches.


At the 2 and 3/4 fold - fold in diagonally on both sides.


Tuck the end into the diagonals, then fold in half.


Insert your cards - inside, front, and back.


Friday, May 20, 2016

Bookbinding in Los Angeles

©Anne Rita Taylor 2016

I like to take a class when I travel. I found Charlene Matthews Bindery in Hollywood when I visited Los Angeles during Halloween 2010. We emailed to come up with a day when she had a workshop. Turned out I was the only student!


Charlene’s bindery is a storefront on Melrose Avenue where you can see the famous Hollywood sign. Charlene has bound books for movies such as Indiana Jones. We had a whole day - including lunch - of bookbinding. I was in heaven! 


Charlene showed me around her fabulous shop and asked me what I’d like to learn. Even though I was bookbinding for a while I look for alternatives to use. Charlene let me know she was using something new: a fine mesh screen-like material for pages and covers. 


Charlene demonstrated, covering the fine mesh with paper; we each made covers. We made the spine pieces, figuring out which paper to wrap around them; we hole-punched the signatures using lovely watercolor paper, and sewed the text block through the mesh onto the spine.


Since I made two spine pieces Charlene suggested I make another book with a leather wrap-around cover. I learned that the thread does not need to go through every station (hole) that was punched. It was a revelation to me!


I love these variations of the Tightback Longstitch Bindings taught by Charlene. I had not used spine pieces before and the books open flat for art journaling.


Charlene sent me home with some of that fine mesh material which I’ve since found at Ace Hardware. Recently I bought a whole roll of it and I'll use it too.  

Friday, May 13, 2016

Discovering Calligraphic Space

©Anne Rita Taylor 2016

Marina Soria’s workshop in 2015, offered to members of the Houston Calligraphy Guild,  “Empty Space: Womb of Shape,” gave me a fun process to use calligraphy in a new and exciting way. We started by writing a very short phrase we liked which we would use during the two day workshop.


I used the calligraphic hand called Uncial, and wrote part of a poem I wrote several years ago, titled: Fellowship of Man - The last paragraph: We know who we are. / We are a mystical union of energy / Pulsing vibrantly. / We are each other.


Marina talked about Taoist Principles, retaining extreme stillness is one was of looking at Empty Space which conveys information by means of a lack of image. Lao Zi stated, “Knowing the white, retaining the black, it is the form of the world.” Interesting ideas!


I wrote my quote several times with a 3.8mm Parallel Pen, quickly realizing it was too long, so I left out words. We traced our quotes; painted with watercolor the spaces between the letters; left out the empty space in the middle; and found geometric shapes within our design. We were finally ready to sew our books, using a Japanese stab binding technique.

We were all inspired! Marina has 20 years of calligraphic experience, taught graphic design: University of Buenos Aires, published in Letter Arts Review, exhibited painting and calligraphy in museums and art galleries in Uruguay, USA, Spain, Japan, Russia and Germany. Read more about Marina’s experience on her website: marinasoria.com.ar.

Friday, May 6, 2016

Learning Coptic Binding

©Anne Rita Taylor 2016

Liz Constable from Book Art Studios posted on Facebook March 17th: You asked! So here I am asking for your help to get me started…Teaching online. What platform do you favor and why? Everyone who comments will go in the draw to win a 1-1 3 hour teaching session with me…


Posting from Liz
I responded that I heard Skillshare is good. And Liz announced on March 28th that I won!  


I was so pleased and excited too!  We started Skyping on Monday April 4th at 4:00 pm my time which was 9:00 am New Zealand time.


Our first session was to determine what I wanted to learn and what Liz wanted to teach. Even though I’ve been bookbinding a good while I find the Coptic stitch to be challenging. I like this style since the book lays flat for art journaling and calligraphy. Liz said she liked the Coptic stitch, so we planned our next one hour meetings for the following 3 Mondays.

For the first teaching session, Liz asked me to have a cup of black coffee available, and to figure out the paper size. I used Arches Text Wove paper - 10 by 6 1/4 inches. Liz demonstrated various ways to dye paper with coffee and other ways to decorate paper. It was most exciting!

Our second session focused on the template. Liz suggested I make the covers the same size as the text block but my covers were slightly larger. (On the covers I used marbled paper a friend brought back from Turkey.) I was a bit derailed with the dreaded template and it took the full hour!


The last session we hole-punched the covers and sewed the book! I had never sewed this type of Coptic binding so it was truly an enriching experience. We went over a half hour and Liz was most patient with me.

The day after our last meeting I sewed another one so I would remember what I had done. 

I used a cloth covered binding this time. I found the Fleur de Lys cloth at Joann's.


I colored the end pages of each of the eight signatures using acrylic paints since they are fast drying. I plan to dye paper with coffee and play with the other methods I learned too!


Coptic binding looks like a row of chain stitches.
Liz is now available to teach via Skype! And she is currently writing an E-Book about bookbinding. I already let her know I am her first customer for that book! Liz can be found on Facebook here:  https://www.facebook.com/BookArtStudios/

If I can answer any questions you have, please ask me by Entering your Comment below.

Friday, April 29, 2016

Traveling Skewer Book

©Anne Rita Taylor 2016

Taking a trip by car, boat or plane? During down time - you can think great thoughts or have interesting conversations with Questions from the Traveling Skewer Book.

Supplies:
Two pieces of wrapping paper or handmade paper - 5 1/2 by 8 1/2 inches
Two pieces of color coordinated paper -  5 1/2 by 8 1/2 inches
2 pieces of ribbon - 15 inches each
Twelve questions to ask while traveling - see below.

Prepare two signatures: 
One piece of handmade paper and one piece of coordinated paper each.
Punch holes in both signatures an inch from the top and bottom.


Place a skewer inside each signature.
Thread the ribbon from the outside into the first signature, around the skewer and out.
Repeat for the second signature using the same ribbon.
Snug up the ends, creating a tight tension.
Tie a knot, make a bow.
Repeat for the other hole.
Snip sharp ends of the skewers.

Use double sided tape to adhere
your questions, such as:
What do you daydream about?
What are your favorite crayon colors?
Did you have something funny happen on a trip?
Which author living or dead would you like to meet?
What would you like to sell in a TV commercial?
What do you miss the most when away from home?


What was your all-time favorite vacation?
If you opened a restaurant what is your house specialty?
What's your favorite fast food meal?
Which would you give up - if you had to - pizza, hamburgers or hot dogs?
What would you perform in a talent show?
Would you rather live in New York, Los Angeles, Chicago or San Francisco?


Actually I prefer Houston, Texas!

Skewer Books are quick to make! Interesting quotes you find make a nice gift too.

Friday, April 22, 2016

David Jones Lettering

©Anne Rita Taylor 2016

By Anne Rita Taylor
I won a Scholarship in 2012 from the Houston Calligraphy Guild. I knew I had to do a meeting presentation at HCG within the year which is a requirement of winning.

By David Jones
While I was working full time I found an online class from an Australian Calligrapher, Gemma Black, on David Jones Lettering, which I had never attempted. David Jones (1895-1974) a poet and calligrapher from England, wrote a page of calligraphy as if he were painting a picture.

By David Jones
David Jones combined Latin, Greek and English. “Exit Edictum" comes from the account of Christ’s birth in St. Luke’s Gospel. Along the left side: “I am Redit Apollo” comes from Virgil’s Fourth Eclogue (selection). Jones preferred colored backgrounds and lettering in colors.


Gemma’s workshop consisted of three lessons, the first two had four exercises each. My letters were written with colored pencils and nibs. Annotating what I wrote with and wrote on was a new experience for me to record what worked and what did not.


We emailed back and forth. Gemma gave me good suggestions on my first attempts and I had hope that I could improve with more practice. Writing on a ground of white acrylic paint was a fun learning experience!


For my Houston Calligraphy Guild presentation I penned my own Exemplar (A to Z) of David Jones Letters. I did not present any of Gemma’s calligraphy since attendees were taking photos and I wanted to preserve Gemma’s copyright protection.


My calligraphy on the cover of the 8 page books I made for each person at the Houston Calligraphy Guild presentation on May 2013. It was a full house with about 60 people attending!


A more recent alphabet I wrote in my journal.


I highly recommend Gemma Black’s teaching! I was lucky to meet her in person when she taught at the Legacies Calligraphy Conference in Dallas during July 2014. We had a lovely time at The Marriott Renaissance Hotel.

Please leave a Comment if you liked learning about David Jones Lettering!


Friday, April 15, 2016

Folded Paper Pouch

©Anne Rita Taylor 2016

I made these pouches for each person in my writing group. With a list of words we used as prompts for writing an essay. After writing for 15 minutes, we would read to the group what we wrote - fun!
Supplies:
Blender, strainer, sponges, towels
Scissors, bone folder
24 inch ribbon
Rubber stamp for front of Pouch, see my Carving Images for Prints for carving instructions
Journal prompt words: Recognition, Honesty, Routine, Assertive, Productivity, Profound, Silence, Respect, Rebellious, Unique, Legendary, Expansive, Achievement, Harmony, Hope


  • Follow instructions in the Arnold Grummer Paper Making Kit
  • Cut handmade paper into an 8 inch square
  • Fold into triangle using the bone folder; Open and fold into opposite side triangle
  • Turn the paper over
  • Fold in thirds again using the bone folder to measure: 2 & 5/8 inches
  • Open and fold the other way into thirds again - the bone folder makes the creases sharper
  • Open and collapse it together 
  • Fold in middle parts on opposite sides
  • Push it together gently
  • Punch hole in one end
  • Tie knot on the inside 
  • Wrap ribbon around and loop through ribbon to tie another knot outside.

Makes a fun wrapper for a small gift too and a lovely way to use handmade paper!